Sunday, December 11, 2011

Stained Glass Art

Description: For this project, we decided which picture we would like to do for our Stained Glass Widow design. We then chose a color for our construction paper outline and stapled the two together. We then laid the picture/ construction paper combo on a piece of wood board and used precision cutters to cut the inside of the design out. Once we were done with this, we took tissue papers and glued them to the back of the design outline to create the stained glass effect. In choosing the colors of tissue paper to use to create our picture, we had to make sure that we used two different color schemes. For my color scheme, I used complimentary colors and primary colors. Once we were done gluing our Stained Glass tissue paper to the outline, we had to cut around the outside of the design so that we had a complete design for our Stained Glass Window picture.


Extension Activity: For an extension activity for this project, you could have students create a timeline of the Stained Glass Art history based on the ideas that were presented during the lesson. You could also have the students do a scavenger hunt for examples of Stained Glass Windows around the city that they live in or around areas where their family lives. You could also have them do a search on the internet for Stained Glass Window examples if there are no examples in the town they live in.

Saturday, December 3, 2011

Print Making

Description: For this project, we designed a picture of our choice that had to do with Nature on the a foam sheet using the end of a paint brush or a mechanical pencil. We had to make sure our design was deep enough using these items so that the paint did not just sit in the lines. Once we were done designing our picture, we took some block paint and put it on a plate. We then took a roller and made sure it was covered with paint. Once it was covered with paint, we rolled the paint onto our foam sheet. We then took our foam design and pressed it paint side down onto a sheet of construction paper to create a mirror image of our foam design. We chose the construction paper based off the color we chose for our mirror image. For this project, we had to do complimentary colors. I chose red for my paint, so the background (construction paper) was green. If I would have chose yellow, my background would have been purple, or blue with an orange background.


Extension Activity: An extension of this activity is you could have the students create a picture based off a specific topic instead of an picture they choose. You could have topic areas that include their favorite animal, a specific kind of animal such as jungle or sea animals, favorite type of plant or tree, a scene from their favorite story as a kid, or any other topic of your choosing. You can also do a bigger picture or a small picture depending on what you want the students topic area to be. You can also have the students create a picture of their favorite president, famous person, or singer/actor.

Cave Art Comes Alive

Description: For this project, we mixed paint pigment with mud to make colored mud we can paint our project with. We first reflected upon memories from our childhood. We then wrote a little summary regarding the picture that we chose to paint. Once we had a memory in mind, we took the mud paint and painted our picture with our fingers. This was an interesting and fun way to paint a picture. Once we were done with our picture, we reflected on the process of painting our picture by answering the reflection questions that were given to us.


Extension Activity: An extension activity that you could do with the mud paint is to have the students paint a picture of their favorite animal that is part of a specific group like jungle animals or something like that if you are working on an animal unit. You could also do this with a plant unit, or their favorite memory of hanging out with their friends or a variety of other topic areas. You could also mix more colors and have the students do a picture of their favorite season, favorite activity to do after school, or anything along those lines as well.

Thursday, December 1, 2011

Fall Into Leaves Collage

Description: For this project, we first started out with taking three warm colored crayons: red, orange, and yellow and used a shape tool to create crayon shavings onto a piece of wax paper. We then folded the paper in half and used an iron to mix and melt the crayon shavings. Once this was done, we traced at least 3 leaf shapes onto the wax paper with a permanent marker and then cut them out. We then glued the leaves to another sheet of paper in an overlapping collage pattern. Once this was completed, we used cool colored oil pastels: blue, green, and purple and created a collage of leaves around the wax paper leaves. We did at least 5 oil pastel leaves to create a collage of at least 8 leaves total with some looking like they are at the bottom, some on the top, and some to look like they were overlapping others.


Extension Activity: I think the ideas of using oil pastels and wax paper crayon shavings would work for any number of projects. one that comes to mind is having the students do a colorful snowflake picture if you are doing a project like this during the winter. You could do one with flowers for the spring, or make a collage of your favorite type of animal, activity, or any number of other topics. You could also use the idea of oil pastels and wax paper shavings to create a regular picture or a story picture, it does not necessarily have to be in a collage format. That is one of the nice things about art, you have the opportunity to combine different types of media in different ways to make a wide range of art projects.

Under Water World Scratch Art

Description: For this project, the students first chose a sample picture of an under water animal to base their picture off of. Next the students folded an 8 1/2" by 11" piece of white paper in half and drew a picture of an underwater animal with the background. Once they completed the drawing, the students then placed the black sheet of scratch art paper in the folded sheet of white paper and used the wooden tool to create an outline on the scratch art paper of their drawing. Once the students had the tracing stage done. They removed the black sheet of paper from the folded paper and started tracing over their lines with the wooden tool to create a picture on the scratch art paper. Once the students had the outline of the items done, they then used the wooden to and different techniques to add detail and texture to their picture.


Bulletin Board:

Under Water World Bulletin Board before projects were added.


Pictures of Under Water World Scratch Art after projects were hung up.


Extension Activity:  A good extension activity with this project is using scratch art paper to do projects with either patterns or other topics. You can make the size smaller or bigger than half an 8 1/2" by 11" project like we did with our lesson. The nice thing is you can use the idea of scratch art projects for just about anything because all it requires is the paper and a wooden pencil. You can also get the paper in different colors. So my idea would be to have the students create a picture of their house and family for introductions or to create a project with overlapping shapes and concepts or anything along those lines.


Tuesday, November 8, 2011

Character Birds

Description: For this project, we first took a note card and wrote down an idea of the character/description for our bird. We named the bird and wrote something about what they are like, look like, and like to do. Once we were done with this, we cut out the already printed layout of our birds body, wings, and tail. We then took crayons or markers, tissue paper, and feathers and decorated our birds body. Making sure to include some time of textural and visual pattern for the bird. Once we were done decorated our bird, we took glue sticks and glued the two pieces of the body together and then glued the wings and tail on. We then punched three holes into our birds body, one hole on each wing and one on the top of the body in a straight line. Once the holes were punched, we tied a piece of yarn through each hole and then tied all three pieces together at the top.


Extension Activity: If you take the ideas behind designing a character and creating your own design for your bird, you can apply it to any animal lesson. You can do something like this if you are doing a lesson on tigers, bears, lions, sharks, or any other animal group. It really lets the students express themselves through a fun project. You could also take this concept and apply it to some group in the plant kingdom, like flowers or trees. The nice thing is you do not have to do just flying animals to make this a fun project for the students. 

Clay Necklace

Description- For this project, we took a section of clay and kneaded the clay to make sure there were no air bubbles. We then took pieces of clay and rolled or formed them around a wooden tool to make the shape of bead that we wanted on your necklace. Forming the clay around the tool allowed us to have a hole to place the piece of yarn through. Once the beads were hardened, we took different colors of tempre paint and painted a design onto the beads. We used the colors of blue, green, yellow, red, white, and black. Once the beads were dry, we placed them in the order we wanted on the piece of yarn and then tied the ends of the yarn together.


Extension Activity: If you are teaching a lesson on social behaviors like respect, friendship, or something along those lines in another subject, you can have the students make either two friendship braclets or some respectful, nice, or friendship based bracelet. You can then have them give it to a classmate as a nice gesture while they keep the other one. You would need to draw names for each student before hand so they do not all choose the same person or pair up and make one for each other. However, with this activity it can really help them be more aware of classmates they may not normally socialize with and it can also teach them the idea of being nice to everyone no matter what. 

Thursday, October 27, 2011

Hidden Safari

For this project, we chose an animal that lives in the safari. I chose a zebra. We then had to turn the picture of the animal we chose upside down. Once we had the picture turned upside down, we took a sky blue colored pencil and drew a picture of the animal that was also upside down. Once we had the picture completed, we turned both pictures right side up to see if they were almost identical. Once we had completed this step, we took Orange, Red, and Yellow colored pencils or crayons and drew patterns using shapes or other patterns to create a camouflage over the animal we drew. I chose to do orange triangles, red circles- both ones that were not filled in and ones that were filled in, and yellow swirls to help create a camouflage over my zebra. Once we were completely done creating our camouflage, we had someone look at it our picture to make sure you could not tell what the animal was. Once we were done with this, we glued our picture onto a piece of 9 x 12 sheet of construction paper and then wrote three clues as to what our safari animal is.

Before we started the designing our project, we made a set of red classes that we could use to check and see if our animal is able to be seen clearly. We took a piece of read construction paper and used a traceable patter to cut a whole where the eye and nose pieces are. We then took a piece of cellophone and either taped or stapled it to the back of our construction paper. We used these classes to help check our progress during the camouflaging stage of our project.


Extension Activity: You could use this same concept of drawing a picture and then camouflaging it with a pattern for other subjects or units as well. You could do this for a unit on water animals, desert animals, Native American Animals, or about any other unit you can come up with. You can also have the students draw more detail into the subject instead of just the animal and then do the camouflage over top. 

Wednesday, October 19, 2011

Eric Carle Story Collage

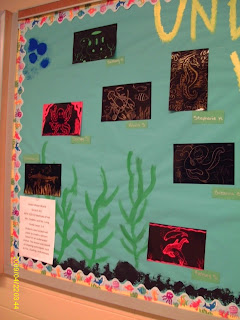
For this project, we first watched a video on how Eric Carle makes the colored paper that he uses. Then we read on of Eric Carle's Stories.Then we used his techniques and wetted a piece of paper with water and then put daps of blue, yellow, red, white, black colors that were each mixed with a harder before hand. Once we had the dabs of paint on the sheet, we took paint brushes and mixed the colors together and covered the entire sheet. We then did different designs on the sheet using the points of a paint brush, or different items like beads, a pattern sheet, or sponges. Once we were done with these, we had to let them dry completely. While these were drying for a couple of days, we designed a pattern on a sheet of construction paper and got the story sheet ready to go. Once the sheets were dry, we traced our shapes on the colored papers, cut them out and put them together on the construction to make our story overlapping the art. To finish up the project, we did a simple sentence as if it were in illustration in a story.


The sentence in the thought bubble says: Misty, Sassy, and Wizzer: "Wish our family would arrive to spend forever in Heaven with us!!"


Extension Activity: As an extension activity, you could chose another Author of a book or series of books and have the students create a story page based off of the techniques they used.  An extension lesson that you could do is use is Beverly Cleary and her ideas behind the story lines. Beverly bases her storys on real world experiences. After you go over her ideas and read one of her stories, you can have the students do a one page story illustration relating to an experience from their own personal lives. 

Wednesday, October 12, 2011

Van Gogh Tissue Collage

The tissue collage is also based off of the techniques that Vincent Van Gogh used in his "Starry Night" painting. For this project, I chose different colors of tissue paper and cut out different shapes to use in my collage. I then placed the tissue paper on a black piece of construction paper and used some tempre glue to keep them in place and give the project a glossy look. While this was drying, I cut out a design on blue and red construction paper to represent the sky view of a city. Once the buildings were cut out, I used black and silver permanent markers to design the windows on the buildings. Once I was done with this part of the project, I used three different colors of Oil Pastels to create movement and emphasis the swirls of the tissue paper. The final step was pasting the city design onto the background. Once this was done, I framed the art work using a different color of construction paper.


Extension Activity:

An extension activity for this project could be using Van Gogh's concepts like the overlapping swirls from his "Starry Night" painting with one color scheme. You could use different shades of one color for the background, two complimentary colors, or a different color scheme entirely. You can also use the same open idea for the background colors, but with a specific design for the close up view, like the design of their yard, or another scene entirely. 

Van Gogh Finger Painting

This project is based off of Vincent Van Gogh's "Starry Night" Painting. This project was done with finger paint useing the colors of blue, yellow, red, white, and black. This finger painting project was based off of the concepts Vincent Van Gogh used in his "Starry Night" painting. I started out painting my picture by using red and yellow to make a sky that resembles a sun rise. I used my fingers and swirled the colors together with some white. I also used a little blue and black to darken some areas of the sky to show resemble a little bit of night that was left. Instead of doing the tree that is in Van Gogh's painting, I decided to do a picture in rememberance of 9/11 and did the World Trade Centers and other buildings in the front, behind the buildings I did some green hills in the middle section and then the sky in the background.  To mix the green hills, I combined yello and blue together.


Extension Activity:


For an extension activity, you could have the students use the same concepts from Vincent Van Gogh's "Starry Night" painting only using a couple of colors. You could do a finger painting with different shades of complimentary colors and focus on the techniques used in the sky line. You could also do a painting only using shades of one single color or a different color scheme with these same techniques.

Wednesday, September 28, 2011

Elements and Principles of Design

Texture:

Wall by Entrance at A-1 Auto Body Shop in Huron, SD


Value:


Steeple at First United Methodist Church in Aberdeen, SD


Repetition:


Old Chinese School House in Victoria, BC


Rhythm/Movement:


Buffalo moving across the road in Yellow Stone National Park, WY


Emphasis:


Waterfall in Yellow Stone National Park, WY


Saturday, September 17, 2011

Footprint Introductions

Foot Print:

To Introduce yourself to the class, you will trace your barefoot or shoe print onto a piece of construction paper and then you will add design to the foot print using 3 different types of media to help describe yourself to the class. Make sure to include your name on the footprint. Here is an example of a footprint that I did to introduce myself:


Description: My name is at the top of both feet, Rose Long. For my activity I traced my tennis shoes. Left Foot:  Right below my name is three blocks that have J.R., R.R, And H.R./E.R. These blocks are for the four people that I have spent a lot of time with recently they stand for Jessica R., Royal R. Eric R., and Henry R. Godmother 2011 stands for the fact that I became the Godmother for Royal over the summer. The next two squares represent the two sides of my family that I love dearly. Below that is  yarn that represents my love for doing different crafts like crocheting, cross-stitching, among other crafts. Then there is a tent and a pole with fish that represent my love for fishing and camping with my family over the summer. Below that is NSUCC which represents the daycare that I work at and the age group.

Right Foot: The two pictures represent my family and my three pets that I love very dearly and are a big part of my life. The next few blocks list books, movies, or series that I enjoy watching or reading and also shows my love for watching movies and reading books. The bible represents the fact that church/ religion is a part of my life. 1st Grade represents the Sunday school class I teach at my church.

Extention Activity: An extention activity that you could do is have trace the footprint to represent themselves and trace a hand print to represent their family. You could have the students to the names, ages or relation of family on the fingers and have them draw or include their favorite activities that they do with their family on the palm of the hand print.